| |
| T H E S P A C
E |
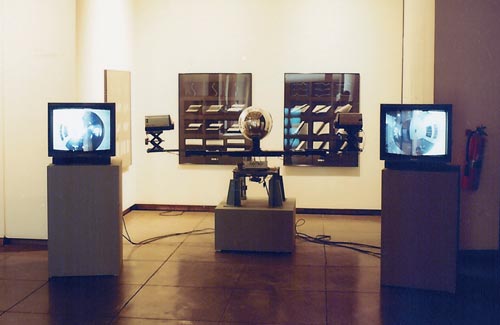
Since the only pictorial input into
this installation is its immediate surroundings
as seen by the cameras, the choice of space assumes
a critical role. Odd spaces of intersecting corridors,
staircases, corners with horizontal, vertical,
or diagonal shapes and shadows are an ideal backdrop
for the observer approaching the exhibit. When
only a featureless room is offered, Steina includes
large vertical panels of relevant images (created
by Woody Vasulka) to be mounted on the walls to
provide the installation backdrop.
Allvision (and Machine Vision) are the only works
of Steina’s requiring daylight or a fair
amount of artificial illumination. They are closed-circuit
environments with no additional media on tape
or disk. There is no audio present. |
|
| |
| E Q U I P M E
N T |
| The Vasulkas can provide
all the equipment listed below, or share resources
with the exhibitor. This will be reflected in
both shipping and equipment budgets. |
| |
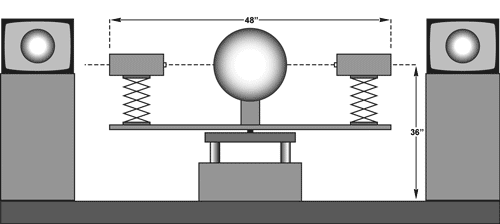
2 video
cameras
2 camera housings
2 adjustable camera stands
mirrored sphere
sphere stand
crossbar
cast aluminum turntable assembly (with gears and
DC motor)
2 DC power supplies (1 for the two cameras, 1
for the turntable)
2 (or more) large monitors (25)
4 power outlets
AC and video cables |
|
| |
| P L A T F O R M |
| The installation rests on the platform
stand, 18 x 18 x 18 inches (gallery support choice),
strategically placed in the exhibit space, usually
at the center. |
|
| |
| A S S E M B L Y A
N D D I S A S S E M B L Y |
- Place the cast aluminum turntable on the
floor or on the provided platform.
- Attach the VDC power supply to verify that
the turntable works before further assembling.
- Attach the mirrored sphere to the crossbar
before placing the bar on the platform.
- Remove the screws on the top of the turntable,
place the crossbar with the sphere on it and
fasten with the same screws.
- Attach the two camera platform assemblies
on each end of the crossbar, with cameras
looking in.
- Connect BNC cables from the two cameras
to A and B marked BNC jacks tucked under the
top of the turntable. These cables should
be hidden under the crossbar, and fastened
with the Velcro strips provided.
- The DC power cables are cabled the same
way.
- At the bottom of the turntable there are
two BNC jacks and a single DC jack for the
external power supply.
- Connect the DC power to the cameras and
the BNCs to the monitors to verify the presence
of a signal.
- Start the turntable.
- Disassemble in the reverse order.
|
|
| |
| T H E D I S P
L A Y |
| Although this work depends on good
illumination of its immediate environment, the
use of video monitors poses a critical dilemma:
how to present a strong image in the presence
of general lighting. The monitors therefore should
not be receiving direct light or have strong surface
reflections. The space should be flooded in all
directions either by artificial or natural light;
then, by adjusting the lens opening or by using
a lower light level on the cameras and setting
the monitors to high contrast, a balance between
the image on the monitor and the light level should
be achievable. |
|
| |
| V I D E O A D
J U S T M E N T |
All 75 ohm terminators located on
the back of the monitors must be switched to open,
except for the last monitor on each chain. Contrast
should be high and brightness below middle. The
basic rule here is to set up the proper deep color
black as a reference to the maximum contrast and
brightness. With that, the other components (hue,
color saturation) can be assigned. The persons
installing the environment must use their esthetic
judgment
as to the proper monitor settings for maximum
visual impact. |
|
| |
| D A I L Y O P
E R A T I O N S |
TO START:
Power up the monitors, turntable, and cameras
(the two AC power strips). Verify that the installation
goes into motion and displays video on the monitors.
If not, turn power off and on again. If problem
persists notify Steina by phone, fax, or e-mail.
TO SHUT DOWN:
Power down monitors, turntable, and cameras.
MAINTENANCE:
The mirrored sphere and monitor screens need
to be cleaned with a soft cloth at least once
a week. |
|
| |
| P O W E R R
E Q U I R E M E N T S |
| |
(depending
on equipment used)
Video monitors:
Video cameras CCDs:
Turntable: |
Sony PVM 1910
|
230 watts
15 watts
40 watts |
|
| NOTE: PAL/NTSC cameras/monitors
must be of a matching standard. Outside USA, use
a power transformer 220 to 110, 500w. |
|
| |
| C R E D I T S |
At the entrance these credits should
appear:
“ALLVISION by Steina, with instrumentation
by Josef Krames, Woody Vasulka, and Bruce Hamilton” |
|
| |
| S H I P P I N G
I N F O R M A T I O N |
| Installation is shipped in four
crates. Weight and dimensions available upon request. |
|
| |
 |