 |
|
| |
| T H E S P A C
E |
The minimum active space required
is 10 meters by 7.5 meters by 3.5 meters high,
or 35 feet by 25 feet by 12 feet high. The major
consideration in terms of space is the total avoidance
of ambient light. The space should be painted
a non-reflective black and no light source should
exist, other than the one that emanates from monitors
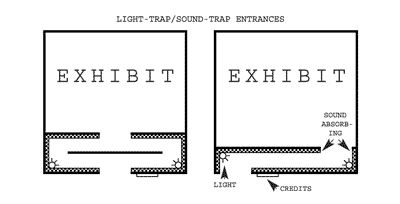
themselves. The entrance must be well insulated
from light and sound. Most ideal is a double trap
door with sound insulating material. (See floor
plan and entrance diagrams.)
NOTE: all the tech equipment, except the two projectors
and mirrors and the screens, should be located
outside the exhibition space, in a small adjacent
tech area. |
|
| |
| E Q U I P M E
N T |
| The Vasulkas can provide
all the equipment listed below, or share resources
with the exhibitor. This will be reflected in
both shipping and equipment budgets. |
| |
2 video
projectors
2 projector stands with mirror assembly attachment
2 Pioneer Video Laser Disk Players, LD-V Series
2 program video laser disks NTSC, color
2 beam splitters in frame assemblies
1 two-channel synchronizer
4 translucent screens in frame or with hanging
harnesses
2 stereo audio amplifiers (4 audio channels)
4 speakers
4 speakers stands or wall mounts
1 four-level equipment stand (rack)
2 video cables (long)
2 pairs of stereo cables (short)
4 speaker cables (long)
7 power outlets |
| NOTE: The laser disk
synchronizer used by the Vasulkas is custom built
and interfaces only with Pioneer Industrial Laser
Disk Players (2200 to 8000 Series). It is not
interchangeable with laser disk players from other
manufacturers, such as Sony and Phillips, which
require a commercially available synchronizing. |
|
| |
| S C R E E N S |
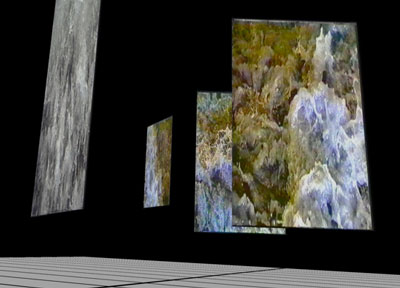
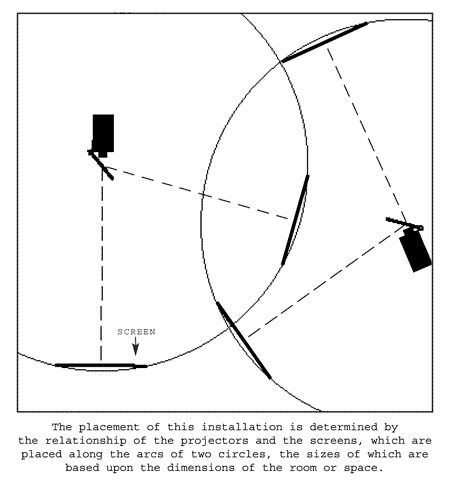
| The primary characteristic of the
translucent screens is to show the image in equal
intensity front or rear. They are either hung
from the ceiling or placed on the floor in self-standing
frame assemblies, arranged in a semi-random pattern,
avoiding explicit symmetry or parallel positioning.
As there is no singular point of view, the environment
must be constructed for the audience to feel encouraged
to enter the room, walk around, cast their shadows
on the screens or sit down. |
|
| |
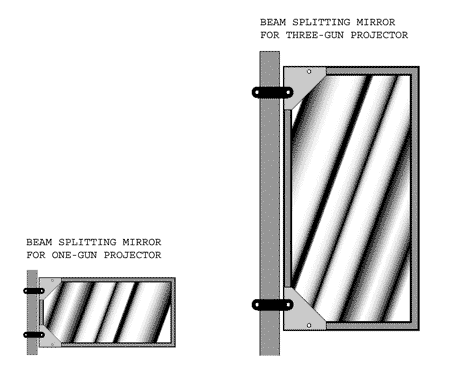
| M I R R O R S A
N D P R O J E C T O R S |
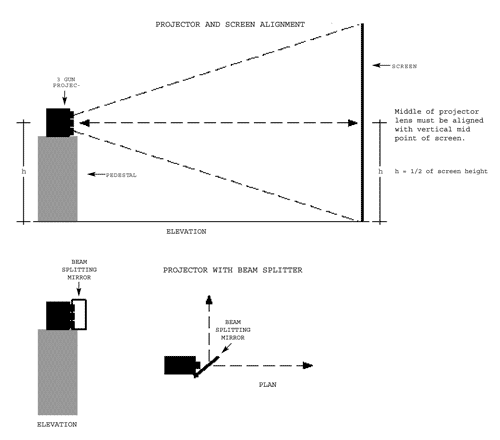
The mirrors are in fact 50% beam
splitters dividing the direct and the deflected
light/image from a single projector in equal amounts
to the two screens. They are a custom-made assemblies
that attach to the projector stands. The positioning
of the mirrors is critical and requires some knowledge
of optics. The mirrors can deflect the secondary
beam anywhere from 30 to 120 degrees, but a positioning
close to 90 degrees is most efficient.
There are two classes of video projectors available:
single lens, or three lens projectors. It is possible
to use four projectors instead of two, avoiding
the complications of the split-mirror alignment
altogether.
NOTE : The three lens projectors require professional
alignment and a larger-size beam-splitter assembly.
The throw distance and the size of screens varies
also, but the projectors must be able to deliver
sufficient amount of light/image. |
|
| |
| P R O J E C T O R S
T A N D S |
| The construction of the projector
stand depends on the type, shape, and weight of
the projector. It is essential that the single
or center lens of the projector is on the level
with the center of the screen (see drawing). The
stand must be constructed to hold the projector
on its side, presenting the image vertically.
The beam splitter (mirror) assembly must be securely
mounted on the platform (squared to the base of
the projector) at exactly 90 degrees to the platform.
Place the projectors according to the drawing
and measure the throw distance (single lens projectors
often have a zoom feature) versus the size of
the screen as mentioned above. |
|
| |
| S O U N D A N
D I M A G E A D J U S
T M E N T |
| Treble should be normal and bass
at maximum. Contrast should be high and brightness
below middle. The basic rule here is to set up
the proper deep color black as a reference to
the maximum contrast and brightness. With that,
the other components (hue, color saturation) can
be assigned. The persons installing the environment
must use their esthetic judgment as to the proper
monitor settings for maximum visual impact. |
|
| |
| D A I L Y O P
E R A T I O N S |
TO START:
Power up disk players and synchronizer. Then,
turn the projectors on (verify pilot light).Wait
a short while to verify that the installation
is starting synchronously. If not, turn power
off and on again for the Players and synchronizer,
NOT THE PROJECTOR. If problem persists notify
Steina by phone, fax, or e-mail.
TO SHUT DOWN:
Turn the power on the projectors off locally
(the fan will keep going until the units have
sufficiently cooled down). After the fans stop,
turn off power distributors for the projectors,
disk players, and synchronizer.
ATTENTION: the projectors may only be turned
off by the power switch on the units and never
by pulling the cable out, as the unit needs
to be cooled down (about one minute) by the
internal fan.
MAINTENANCE:
The projection lenses and the mirrors need to
be cleaned with a soft cloth at least once a
week. |
|
| |
| P O W E R R
E Q U I R E M E N T S |
| |
(depending
on equipment used)
Video projectors:
Stereo amplifiers:
Video disk players:
Synchronizer: |
Sharp XG-2000U
Sharp XV- P10U
Pioneer 2200
Pioneer 8000
Jericho Data Systems |
230 watts
175 watts
150 watts
70 watts
100 watts
40 watts |
|
| Outside USA, use a Power
Transformer 220 to 110, 1000w. |
|
| |
| S H I P P I N G
I N F O R M A T I O N |
| Installation is shipped in 3 crates.
Weight and dimensions available upon request. |
|
| |
 |
| |
 |
| |
 |
| |
 |
| |
|
|
|